Google Earth & Gaia GPS
Consider this: Alaska adventurers Luc Mehl and Roman Dial ice skated 100 miles in two days from Selawik to Kotzebue. That's cold, Alaska wilderness. Their only navigation tools where two iPhones loaded with routes, maps and images. No paper maps. No compass. No battery packs. No solar panels.
Although I also navigate with my phone, I think paper maps combined with compass and altimeter work better. They teach mountain skills and a sense of direction. Following the blue dot on your phone does not. In the past I've navigated wilderness and whiteout for thousands of hours without a problem. As much as I wish smartphones and their apps would disappear, they are the new norm, especially for a guide like myself who needs to stay current.
In talking with Luc, Roman and mountain professionals such as Mark Smiley and Henry Munter, the best tools for route planning and backcountry navigation are Google Earth and the Gaia GPS app. I hope this tutorial will help you get started.

My neighbor and friend Luc Mehl planning his annual spring ski trips in Alaska.
Steps for Digital Trip Planning
Prepare the route on Google Earth.
Export .kmz file.
Import .kmz to www.gaiagps.com and sync route to phone, or
Import straight to phone
Download Gaia GPS maps to phone.
Other Great Tutorials
Luc's Google Earth tutorials.
Mark Smiley's Gaia and Google Earth tutorial.
1a) Install a Topo Layer onto Google Earth
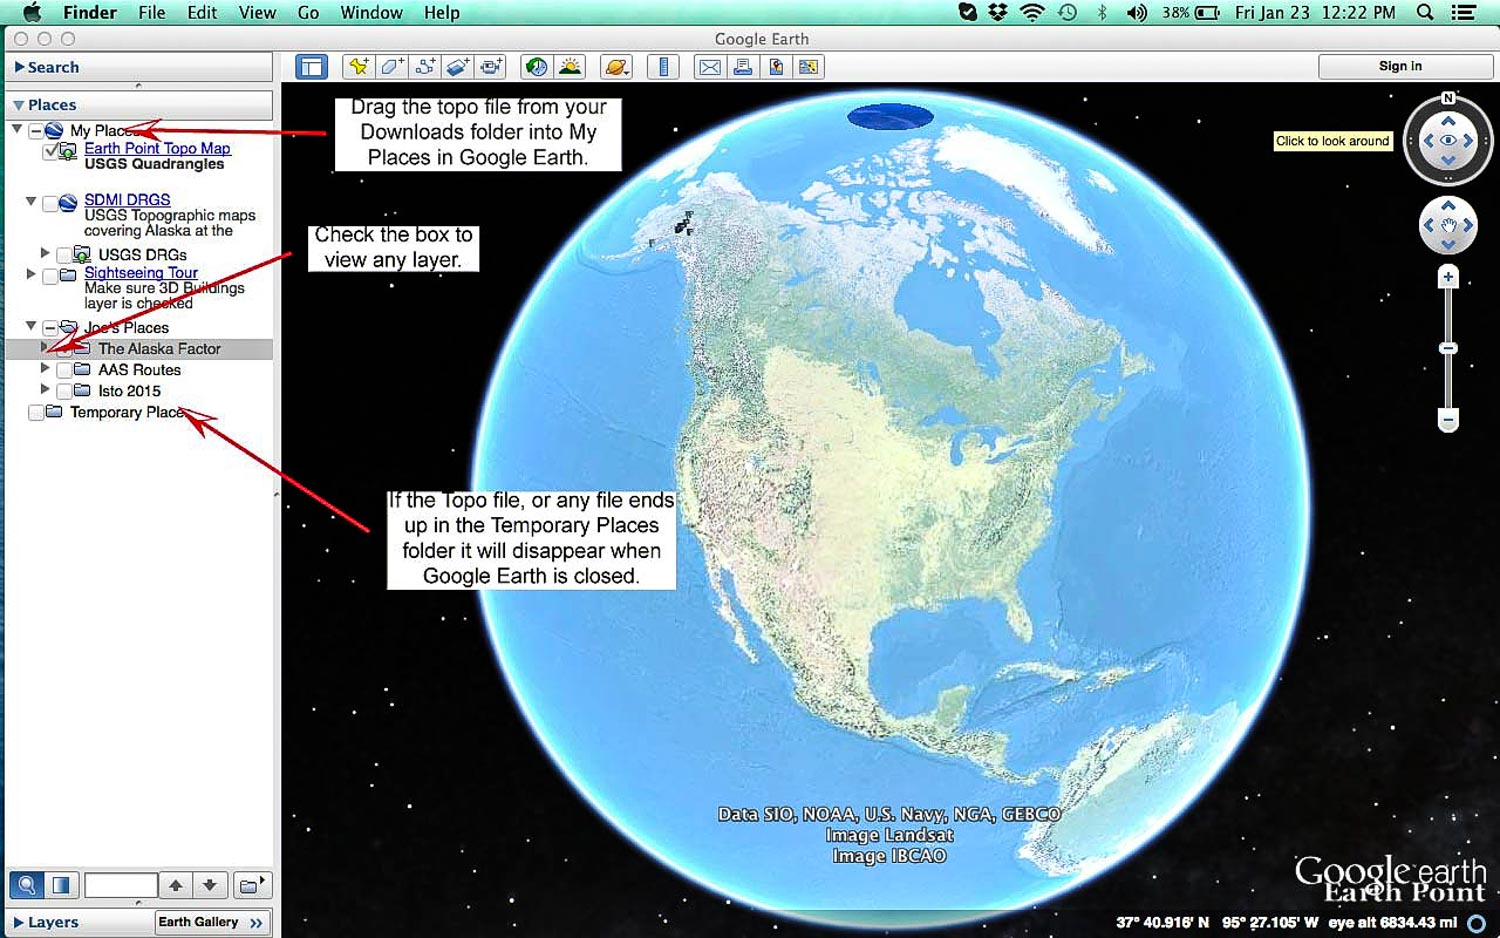
First, download Google Earth Pro onto your computer. Then download the Earth Point topo layer by going to earthpoint.us/topomap.aspx and clicking on the “View On Google Earth” button to download. Click on the downloaded EarthPointTopoMap_211309.kml file to open it in Google Earth. In Google Earth, drag it from Temporary Places to My Places or else the topo layer will disappear after you close Google Earth.
Important Mac Shortcuts
Move: use arrow keys
Rotate direction: shift right/left
Tilt: shift up/down
Perspective:command up/down/left/right
Untilt: U
North Up: N
1b) Create a File for Your Trips
Organize your Google Earth trips by creating a file in My Places.

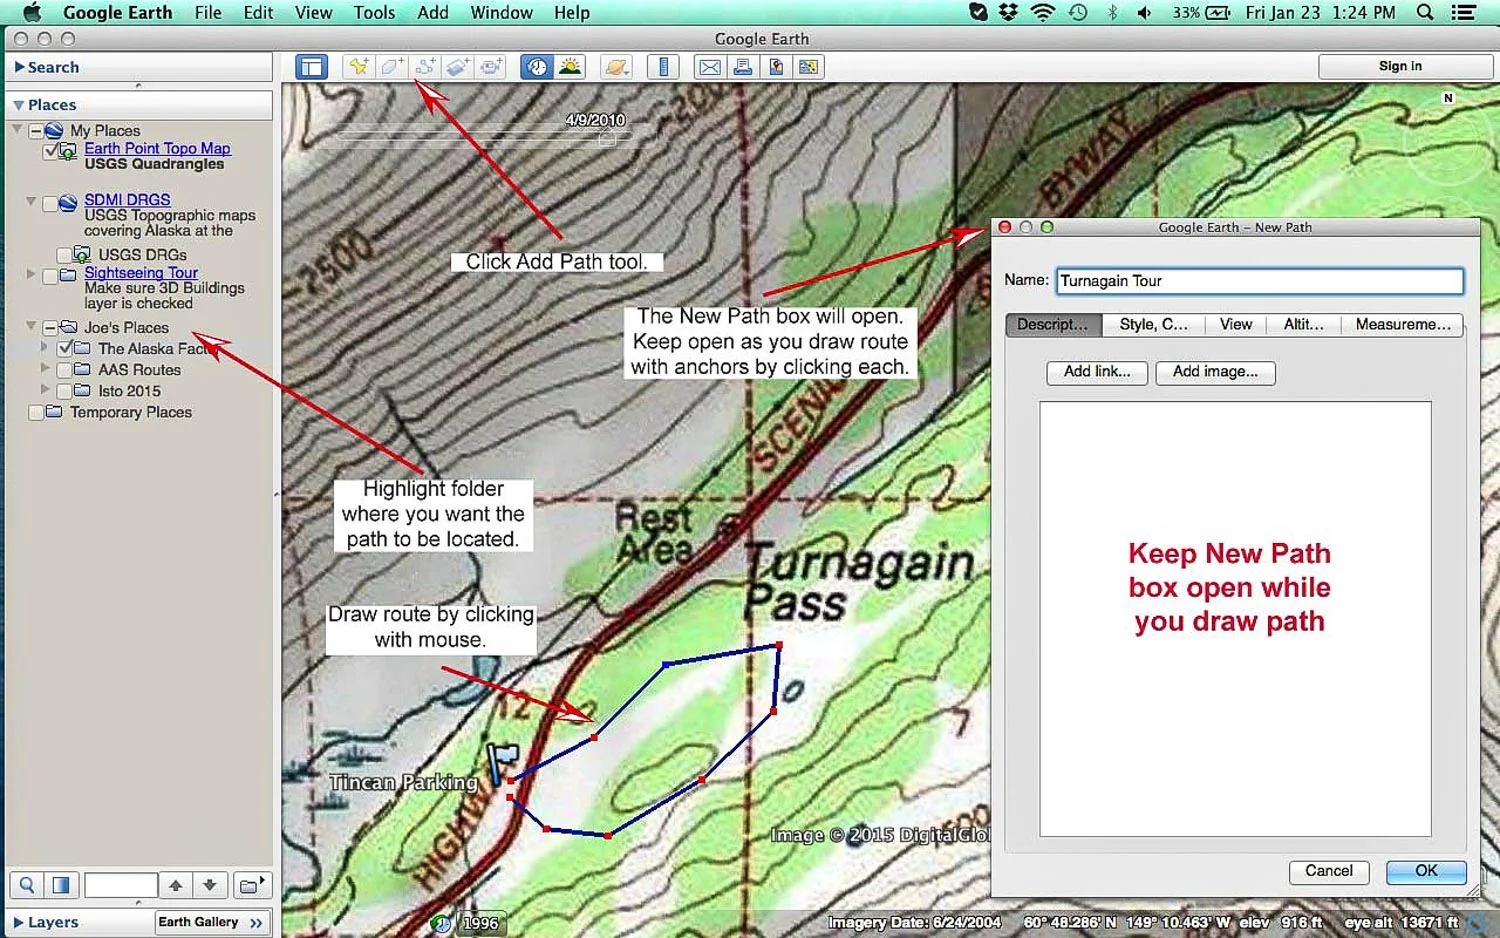
1c) Create a Route (Path)
To create a route (called Path in Google Earth), highlight your new folder (e.g. Joe's Places), click the Add Path tool. Keep the New Path box open as you click each waypoint. Do not draw a path or it will add a million points and will be difficult to edit.
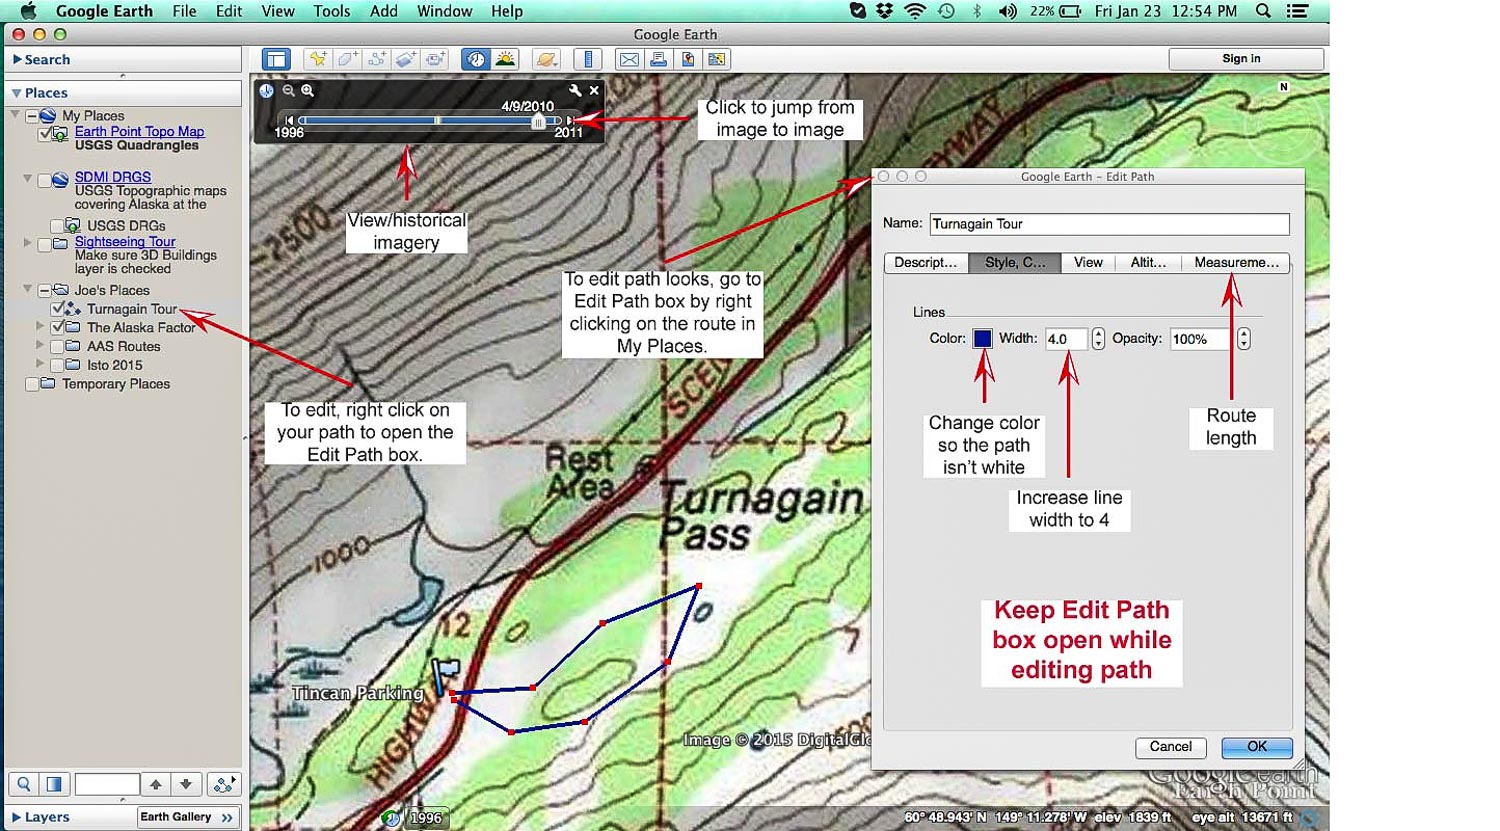
1d) Edit Route
Make the line a color and thickness that’s easy to read. Resume drawing by clicking a new anchor on the route you're drawing. The start and end of the route don't join. To remove points: click on the route, then click delete or right click.
1e) Add Waypoint (Placemark)
To add a waypoint (called Placemark on Google Earth), right click the folder where you want the waypoint located, then Add Placemark. To add a waypoint at a known lat/long, type it into Get Info.

1f) View Image

2) Export Google Earth File
To export a file, route or waypoints from Google Earth, select the item (e.g. The Alaska Factor), File, Save, Save Place As..., name file, save as .kml, which is the full, unzipped file.

3) Optional: Load .kml File onto Gaiagps.com
The GaiaGPS website is a good way to organize your files and view maps on the big screen before loading them onto your phone. Some people prefer it to Google Earth. I prefer to use Google Earth which has 3D and tilting and to skip Gaiagps.com.

4) Load .kml file Directly onto Gaia App
I prefer this fast and easy option. Email yourself the .kml file, press and hold that .kml attachment in your phone email. Open on the Gaia app. Here's a video tutorial.

5) Download Maps to Your Gaia App
To select an area to download, hit the ⊕ icon at the top of Gaiagps app, and select Download Maps. Do this at Max Zoom 16 or less before you go into the field. If you already have a route on your phone, download maps for that route by going to Saved and select the route, and then Download Maps for Track.

My favorite maps are:
USGS Topo Base Map
World Imagery by ESRI
Slope-Angle Shading by CalTopo
SwissTopo for Switzerland
France IGN Topo for France
Canada Topo by NRCAN

Saving Your Battery
Phone: keep your phone warm, near your skin and/or stick a foot-warmer on it.
Phone: keep in airplane mode, the gps still works in airplane mode.
Phone: dim screen.
Phone: Settings,/Battery, Low Power Mode, toggle on
Gaia: Avoid recording your route. Recording your route eats battery.
Gaia: Settings/Power Saving/Map Controls/Compass, toggle off
Gaia: Settings/Power Saving/Disable Altitude Lookup, toggle on.
Bring external battery with cable.
Tether Your Phone to Your Person

Prepare for a Worse-Case Situation
On a recent trip to the Alaska Range I was reminded to not put all of my trust into phones for navigation. I will still plan on using GaiaGPS as my first choice for field navigation, but I’ll bring a paper map, compass, altimeter and battery as backup. Some problems with entirely trusting phones for navigation is:
Phones are hard to read in bright conditions, like in thin fog on a glacier.
Phones freeze up quickly. Yes, there are tricks like taping a heat pack to them and keeping them in your warm pocket. But for real whiteout navigation in cold weather it’s akin to using a canister stove in sub-zero temps; it’s just not the right tool for the job.
The phone screen doesn’t work in wet conditions.
Water can ruin phones.