Mountain Skills & Mindset

Managing Client Expectations

Happy clients make happy guides

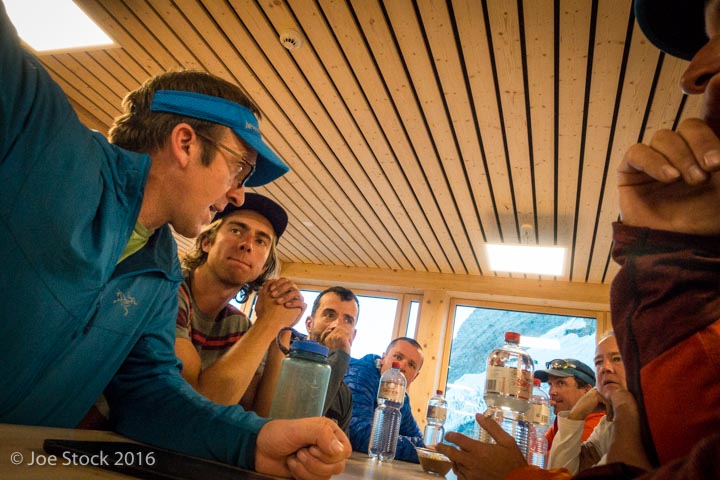
Near the summit of Mont Blanc, our clients huddled together and discussed the route ahead. The night before, at the Tête Rousse hut, co-guide Matthieu Desprat spent an hour telling them about the route. They knew the next section to the summit was steeper, exposed to higher wind and lower oxygen. They also knew that the summit was only halfway to safety. They were tired and the wind had increased. Among themselves, they decided to turn around and try again another day. This was an ideal situation; the guide presented the necessary information in advance and the clients felt the decision was their own.

Discussing the route at the Refuge de Tête Rousse, Mount Blanc, France.

*     *    * 

Mountain guides say their job has three parts: to minimize risk, to achieve the client's objective and to show the client a good time. Within these jobs, one of the more difficult is to manage the client’s expectations about an objective. Descending from an unreached summit with a disgruntled client is a bad situation for any guide. So what makes the difference between clients who agree to turn back and those who blame the guide for their failure?  

Managing client expectations takes maturity and practice. It's a skill that some career guides have mastered and newer guides should be aware of and work toward. The following are some techniques for managing client expectations. Some of the concepts are borrowed from business. Others are unique to guiding. 

1) Discuss objectives and risks.

First of all, try to understand your clients’ objectives—just as competent doctors listen to their patients before prescribing treatment. Before the trip, ask them what they want to get out of the trip. Say, for example, "What is your goal for this trip?" or "Do you want to spend time on skills or focus on an objective?" With a better understanding of your client’s desires you can present options that better match their desires. Explain the pros and cons of each and incorporate their ideas into the decision. If their expectations are unreasonable, give them enough information about the objective so they can see that another objective is better. 

Also, before the trip, discuss risk with the client. Review the dangers that will be encountered. Explain that you cannot make the trip safe, but your priority will be to minimize the risks. Explain that returning alive and in one piece is paramount and that any final decision is yours. 

Problems arise when a client does not respect or accept the guide's decision. Help alleviate the problem by pointing out and explaining the hazards and reiterating the trip priorities as you go along. 

Clients may also have a different risk tolerance than the guide. For example, if the guide feels uncertain about the snow stability and turns the group around, but a client wants to keep going, the client either has not been well informed about risks or the client has a greater risk tolerance than the guide. In this the latter case, the guide-client relationship is not compatible. On future trips, the client may be better suited to another guide with a higher risk tolerance. 

2) Frontload communication. 

Dylan Taylor briefing clients at the Hornli Hut the evening before climbing the Matterhorn, Switzerland.

Before the trip, keep the clients informed through a pre-trip letter. When possible, be available on email or by phone. This communication helps replace trip anxiety with trip anticipation. 

At the pre-trip meeting, look at the weather forecast, avalanche advisory and maps together. This gives the client a clear mental picture of the route and conditions. 

Continue to frontload communication throughout the trip. Provide information before each day and at each transition, just as you make a plan before crossing avalanche terrain. Armed with more information, the client will have a more accurate perception of the risk and will be easier to work with. 

3) Underpromise, overdeliver.

Newer clients often want concrete answers, such as being told they will get to the summit. They can have a difficult time understanding the uncertainties encountered in the mountains. If clients have high expectations and those expectations are not met, they will be disappointed. If clients have lower expectations and are surprised with a success, they will have a better experience. 

To reduce their expectations, make promises you can keep. Like, "I will make my best effort to get you to the summit, but the summit is not guaranteed." Forewarn them that the summit is one of the possible outcomes. Use phrases like, “Remember that the summit is only halfway.” Remain non-committal by using terminology like, "Let's go up to 9,000 feet and look at our options." Keep an attitude that concentrates on the journey, not the destination, so the summit is not the singular goal. 

4) Make decisions with clients.

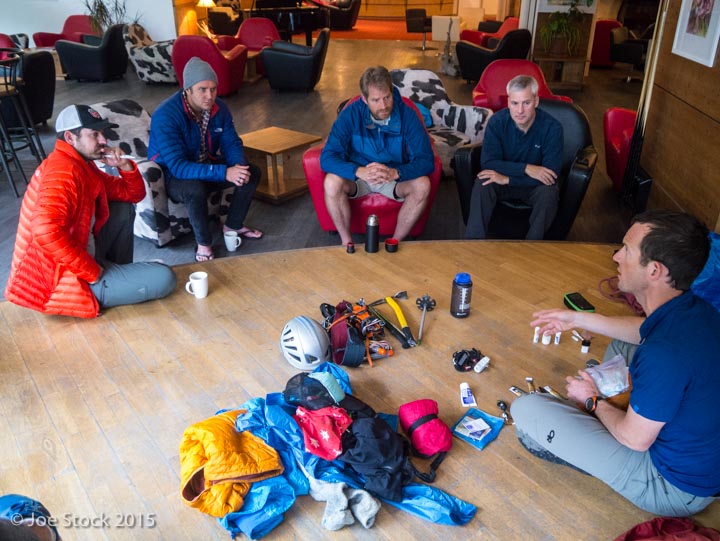
Forest McBrian discussing the gear in his pack before a trip.

A guide's job is managing risk with good decision-making; the guide has the final call with all safety decisions. While this is a powerful position, the experienced guide includes clients in many decisions.

From the start of the trip, include clients in decision-making. The earlier the better. This serves to enhance their appreciation for the challenges and lessen their disappointment if an objective cannot be achieved. 

Select the route with your clients. Seriously consider any suggestions they make; they are often good. As IFMGA Mountain Guide Willie Benegas wrote, "Clients are your climbing partners, decision making should be done as a team." This invests them in the trip and they are better prepared to switch to plan B or C if needed. 

The ultimate goal is to have clients make key decisions themselves. If the guide provides the clients with the right information and uses gentle nudges (indirect suggestions), the clients can feel the decision is theirs. This empowers the clients and leads to a better group dynamic.  

The wisdom of groups was illustrated by Lior Zoref, who brought an ox onto the TED stage. Each person in the audience submitted their guess of the ox's weight. The low guess was 308 pounds. The high guess was over 8000. The average was 1792. The ox's true weight was 1795. 

5) Help clients cope with failure.

What if you fail to reach an objective that your client really wants? If the client is adequately prepped, it won’t be a shock. IFMGA Mountain Guide Kathy Cosley says that if a client's failure is due to their own limitations (such as lack of fitness or skill), use tact and come up with suggestions and a training schedule for the next attempt. If mountain conditions (external factors) are the reason for the failure, then the situation is more straightforward. Reassure them that the mountain will always be there, but it can't always be climbed on their terms. Tell them that's why it's called mountaineering, not summiting. Despite your best efforts, sometimes a client will be upset and time may be the best remedy.  

*     *     * 

It's easy to keep a client happy when things are going well. Your guiding skills are truly tested when the plan goes awry. It takes diligence to hone your skills at managing client expectations, but it's worth it. It will lead you to the grail of mountain guiding: return clients and lasting friendships. 

A checklist for managing client expectations through communication 

Prior to and during the trip

  • Pre-trip letter to client?

  • Ideal objective and alternates identified?

  • Route and maps viewed with client?

  • Weather reviewed with client?

  • Risks reviewed with client?

  • Client knows that minimizing risk is your priority and the final decision is yours?

  • Client encouraged to focus on the journey, not just the destination?

Ski guiding

  • Avalanche advisory viewed with client?

  • Terrain progression explained?

  • Companion rescue reviewed with client?

  • Tour plan reviewed with client?

More Reading

How to Read Glacier Health

The Canary in the Coal Mine

Glaciers are visual indicators of climate, if you know how to read them. With a trained eye, mountaineers can simply look at a glacier and know the local climate trend. After numerous discussions with glaciologists, I've narrowed down a list to five visual indicators that a glacier is unhealthy. 

1) Unhealthy glaciers lack snowcover.

Snow feeds glaciers. At the end of summer, if a glacier is less than two-thirds covered with snow, then it is an unhealthy glacier. In other words, before the first winter snowfall, the equilibrium line altitude, which divides the accumulation zone from the melt zone, should be no more than a third of the way up from the glacier terminus—otherwise the glacier is losing volume. 

A small, unnamed glacier in the Chugach Mountains. This glacier's equilibrium line altitude is at a good position for a healthy glacier. The problem is, this photo was taken in early July. Two months of summer melt season remain. Many small glaciers…

A small, unnamed glacier in the Chugach Mountains. This glacier's equilibrium line altitude is at a good position for a healthy glacier. The problem is, this photo was taken in early July. Two months of summer melt season remain. Many small glaciers in Alaska will soon be gone.

2) Unhealthy glaciers have lost ice thickness.

In response to warmer temperatures, glaciers lose ice through thinning, even more so than by receding. From a climber’s perspective, your altimeter or GPS might register elevations lower than those shown on the map. Some glaciers, such as the Taku Glacier in Alaska's Coast Range or the center of the Greenland ice sheet, have increased snowfall in their accumulation zones. This is because the warmer than normal temperatures, while remaining below freezing, allow the air to hold more moisture and produce more snow. 

Navigating by GPS in the Tordrillo Mountains in the Alaska Range. Maps worldwide show glacier elevations higher than your GPS will read.

Navigating by GPS in the Tordrillo Mountains in the Alaska Range. Maps worldwide show glacier elevations higher than your GPS will read.

3) Receding glaciers have ramped ends.

Receding glaciers have a relatively crevasse-free, sloping snout, like a wheelchair ramp, created by ice stagnating and melting in place. Healthy glaciers, like the Taku, have heavily crevassed, vertical or bulbous fronts. 

The Raven Glacier in the Western Chugach. You can walk right onto receding glaciers.

The Raven Glacier in the Western Chugach. You can walk right onto receding glaciers.

4) Trim lines surround dying glaciers.

Like bath tub rings, thinning glaciers leave trim lines on the valley walls that show the most recent high ice level. As the glacier melts down, a visible line remains on the valley wall between the vegetated and lichened terrain above and the exposed moraine and lichen-free rock below. Like high water marks, trim lines surround shrinking glaciers worldwide. Most obvious are trim lines from the Little Ice Age that ended 100 to 150 years ago. Unhealthy glaciers have trim lines far above the glacier surface. 

Climbing Mount Baker's Easton Glacier with trim lines visible high above the present glacier surface.

Climbing Mount Baker's Easton Glacier with trim lines visible high above the present glacier surface.

5) Moraine surrounds and covers the end of receding glaciers.

With less snowfall and warmer temperatures, the glacier conveyor belt slows and moraine accumulates on the glacier surface, sometimes until the ice is entirely covered. Thus, receding glaciers have moraine-covered melt zones, while healthy glaciers have white-ice melt zones. When the ice under the moraine melts, the mud, rock and boulders become ground moraine. Early successional species, such as moss and alder, grow on this newly exposed land in the wake of a receding glacier. In contrast, the vegetation in front of a healthy glacier is characterized by climax forest, with old-growth species, like hemlock.

Moraine in the Western Chugach Mountains.

Moraine in the Western Chugach Mountains.

Big glaciers are hard to read

Big glaciers and glaciers in winter can be difficult to diagnose. In winter and spring, a thick blanket of snow covers most glaciers. During this time, seeing glacier health indicators like moraine and trim lines is more difficult, but still possible. Diagnosing glacier health on some big glaciers, such as the Kahiltna Glacier on Denali, presents another problem. On Denali, most climbers fly to 7,000 feet on the Kahiltna and spend their entire trip on a thick seasonal snowpack where the glacier appears fat and happy. In these situations, observe the melt zone on the flights in and out, looking for trim lines, fresh moraine, and moraine-dammed lakes.

Touring near Denali base camp at 7,000 feet on the Kahiltna Glacier.

Touring near Denali base camp at 7,000 feet on the Kahiltna Glacier.

Every season us mountaineers find changing climbing conditions in the glaciated mountains. As glaciers melt down, bergschunds become wider, making route access more difficult. Once on the route, you’ll find steep glacier headwalls normally covered by spongy neve have become black ice. And with less neve, you’ll see more rockfall, such as during the heat waves in 2003 and 2015 that closed Mont Blanc. But as glaciologist Keith Echelmeyer told me, “All change is not so bad—some routes may become more challenging and fun.” 

Google Earth & Gaia GPS

Consider this: Alaska adventurers Luc Mehl and Roman Dial ice skated 100 miles in two days from Selawik to Kotzebue. That's cold, Alaska wilderness. Their only navigation tools where two iPhones loaded with routes, maps and images. No paper maps. No compass. No battery packs. No solar panels. 

Although I also navigate with my phone, I think paper maps combined with compass and altimeter work better. They teach mountain skills and a sense of direction. Following the blue dot on your phone does not. In the past I've navigated wilderness and whiteout for thousands of hours without a problem. As much as I wish smartphones and their apps would disappear, they are the new norm, especially for a guide like myself who needs to stay current. 

In talking with Luc, Roman and mountain professionals such as Mark Smiley and Henry Munter, the best tools for route planning and backcountry navigation are Google Earth and the Gaia GPS app. I hope this tutorial will help you get started. 

My neighbor and friend Luc Mehl planning his annual spring ski trips in Alaska.

My neighbor and friend Luc Mehl planning his annual spring ski trips in Alaska.

Steps for Digital Trip Planning

  1. Prepare the route on Google Earth.

  2. Export .kmz file.

  3. Import .kmz to www.gaiagps.com and sync route to phone, or

  4. Import straight to phone

  5. Download Gaia GPS maps to phone.

Other Great Tutorials

1a) Install a Topo Layer onto Google Earth

First, download Google Earth Pro onto your computer. Then download the Earth Point topo layer by going to earthpoint.us/topomap.aspx and clicking on the “View On Google Earth” button to download. Click on the downloaded EarthPointTopoMap_211309.kml file to open it in Google Earth. In Google Earth, drag it from Temporary Places to My Places or else the topo layer will disappear after you close Google Earth. 

Gaia 1-2.jpg

Important Mac Shortcuts

  • Move: use arrow keys

  • Rotate direction: shift right/left

  • Tilt: shift up/down

  • Perspective:command up/down/left/right

  • Untilt: U

  • North Up: N

1b) Create a File for Your Trips

Organize your Google Earth trips by creating a file in My Places. 

Gaia 2-2.jpg

1c) Create a Route (Path) 

To create a route (called Path in Google Earth), highlight your new folder (e.g. Joe's Places), click the Add Path tool. Keep the New Path box open as you click each waypoint. Do not draw a path or it will add a million points and will be difficult to edit.

Gaia 3-2.jpg

1d) Edit Route

Make the line a color and thickness that’s easy to read. Resume drawing by clicking a new anchor on the route you're drawing. The start and end of the route don't join. To remove points: click on the route, then click delete or right click. 

Gaia 4-2.jpg

1e) Add Waypoint (Placemark)

To add a waypoint (called Placemark on Google Earth), right click the folder where you want the waypoint located, then Add Placemark. To add a waypoint at a known lat/long, type it into Get Info. 

Gaia 5-2.jpg

1f) View Image 

Gaia 6-2.jpg

2) Export Google Earth File 

To export a file, route or waypoints from Google Earth, select the item (e.g. The Alaska Factor), File, Save, Save Place As..., name file, save as .kml, which is the full, unzipped file.

Gaia 7-3.jpg

3) Optional: Load .kml File onto Gaiagps.com

The GaiaGPS website is a good way to organize your files and view maps on the big screen before loading them onto your phone. Some people prefer it to Google Earth. I prefer to use Google Earth which has 3D and tilting and to skip Gaiagps.com.

Gaia 8.png

4) Load .kml file Directly onto Gaia App

I prefer this fast and easy option. Email yourself the .kml file, press and hold that .kml attachment in your phone email. Open on the Gaia app. Here's a video tutorial

Gaia 11.jpg

5) Download Maps to Your Gaia App

To select an area to download, hit the ⊕ icon at the top of Gaiagps app, and select Download Maps. Do this at Max Zoom 16 or less before you go into the field. If you already have a route on your phone, download maps for that route by going to Saved and select the route, and then Download Maps for Track. 

5a IMG_1521.jpg

My favorite maps are:

  • USGS Topo Base Map

  • World Imagery by ESRI

  • Slope-Angle Shading by CalTopo

  • SwissTopo for Switzerland

  • France IGN Topo for France

  • Canada Topo by NRCAN

5b IMG_1522.jpg

Saving Your Battery 

  1. Phone: keep your phone warm, near your skin and/or stick a foot-warmer on it.

  2. Phone: keep in airplane mode, the gps still works in airplane mode.

  3. Phone: dim screen.

  4. Phone: Settings,/Battery, Low Power Mode, toggle on

  5. Gaia: Avoid recording your route. Recording your route eats battery.

  6. Gaia: Settings/Power Saving/Map Controls/Compass, toggle off

  7. Gaia: Settings/Power Saving/Disable Altitude Lookup, toggle on.

  8. Bring external battery with cable.

Tether Your Phone to Your Person  

Prepare for a Worse-Case Situation

On a recent trip to the Alaska Range I was reminded to not put all of my trust into phones for navigation. I will still plan on using GaiaGPS as my first choice for field navigation, but I’ll bring a paper map, compass, altimeter and battery as backup. Some problems with entirely trusting phones for navigation is:

  1. Phones are hard to read in bright conditions, like in thin fog on a glacier.

  2. Phones freeze up quickly. Yes, there are tricks like taping a heat pack to them and keeping them in your warm pocket. But for real whiteout navigation in cold weather it’s akin to using a canister stove in sub-zero temps; it’s just not the right tool for the job.

  3. The phone screen doesn’t work in wet conditions.

  4. Water can ruin phones.

Guide Wage Transparency

Guide Wage Transparency

Guiding for a living is a challenge in the United States. Yes, we guide because we love the mountains and enabling others to enjoy the mountains. We also guide to make money. The problem is that guide wages are generally low and variable. It is a struggle to make guiding your real job, where you earn enough to support a family and own a house. This creates frustration and a sense of unfairness among many U.S. guides. Although some guide services strive for fair pay and better pay for their guides, the existing system is not working for many professional guides.